In the world of woodworking, creating strong and precise joints is one of the most important aspects of producing high-quality furniture, doors, windows, and other wooden structures. One of the most popular and reliable techniques is the finger joint—a method where two pieces of wood are interlocked like the fingers of your hand, offering both durability and a seamless finish.
To make this process faster, more accurate, and consistent, manufacturers use Finger Joint Cutting Machines. These machines are designed to cut precise profiles in wood so that the pieces fit together perfectly, reducing wastage and increasing efficiency.
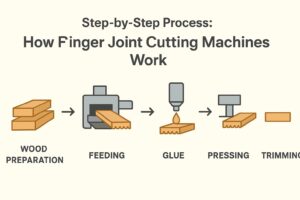
In this blog, we’ll take you through the step-by-step process of how a Finger Joint Cutting Machine works, along with its importance in the woodworking industry.
1. Wood Preparation
Before the actual cutting begins, the wood is prepared. This involves:
Selecting quality wooden planks or blocks.
Ensuring the wood is dried properly to avoid shrinkage or warping.
Cutting the wood into desired lengths for the finger joint process.
Proper preparation is key because any unevenness or moisture can affect the accuracy of the joints.
2. Feeding the Wood
The prepared wooden pieces are then fed into the finger joint cutting machine. Depending on whether the machine is manual, semi-automatic, or fully automatic, the feeding process may involve manual handling or conveyor belts.
Automatic machines generally have hydraulic or pneumatic feeding systems that ensure the wood is pushed at a consistent speed and alignment.
3. Precision Cutting with Cutter Heads
This is the heart of the process. The machine uses special cutter heads equipped with multiple blades or knives that create the distinctive “finger-like” pattern on the edge of the wood.
The blades cut alternating ridges and grooves.
Each finger (projection) is cut to a precise length and angle.
The design ensures that when two pieces are joined, they interlock seamlessly.
4. Applying Adhesive (Glue Application)
Once the fingers are cut, a strong adhesive (usually PVA glue) is applied to the joint area. The glue ensures that the joint doesn’t just rely on the interlocking fingers but also has added bonding strength.
Modern machines often come with integrated glue applicators that spread adhesive evenly, saving time and improving accuracy.
5. Joint Assembly
After glue application, the wood pieces are pressed together so that the fingers interlock perfectly. This is where the strength of the finger joint becomes visible.
Hydraulic or pneumatic pressure is often used to ensure tight joints.
The interlocking fingers and glue create a bond stronger than the original wood.
6. Pressing & Curing
Once the pieces are joined, they are kept under pressure for a set amount of time. This allows the glue to cure and form a solid, unbreakable bond.
Depending on the adhesive used and environmental conditions, the curing process can vary from a few minutes to several hours.
7. Trimming & Finishing
Finally, the jointed wood passes through a trimming unit where any excess fingers or uneven surfaces are removed. This ensures the final product is smooth, straight, and ready for use in furniture, doors, panels, or other wooden structures.
Some machines also offer sanding attachments for a polished finish.
Benefits of Using Finger Joint Cutting Machines
High Strength Joints: Finger joints are often stronger than the wood itself.
Material Savings: Reduces wastage by using smaller wood pieces effectively.
Improved Aesthetics: Creates a smooth, seamless appearance.
High Productivity: Automatic machines increase output for large-scale production.
Versatility: Suitable for softwoods, hardwoods, and engineered wood.